 PDF
PDF
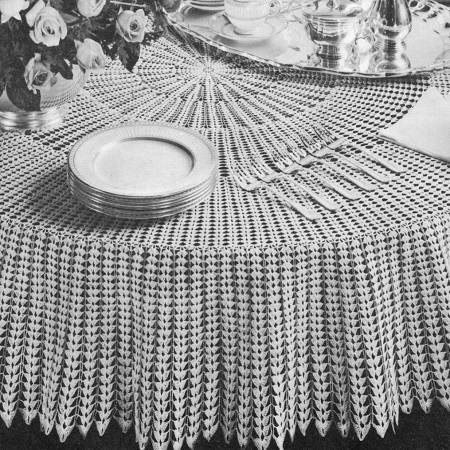
Lovely Lagoon Tablecloth Pattern
Celebrate your love of crochet with this detailed pattern, creating a centerpiece that’s as stunning as it is satisfying to make.
MATERIALS: Tablecloth measures approximately 60 inches in diameter. CLARK'S "BIG BALL" MERCERIZED CROCHET, Art. B.34, Size 30: 15 balls of No. 1 White, No. 61 Ecru or No. 42 Cream, and 1 ball of No. 165 Pastels. Milwards Steel Crochet Hook No. 10.
NOTE: Hereafter White, Ecru or Cream is referred to as Main Color.
Starting at center: With Main Color, ch 6. Join with sl st to form ring.
1st Rnd: Make 12 sc in ring. Join to first sc.
2nd Rnd: Ch 5, (dc in next sc, ch 2) 11 times. Join to 3rd ch of ch-5.
3rd Rnd: In first sp make sl st, ch 3, dc, ch 3 and 2 dc - 4-dc starting shell made; ch 1, * in next sp make 2 dc, ch 3 and 2 dc-4-dc shell made; ch 1. Repeat from * around. Join to top of ch-3 - 12 shell spokes started. Place a marker in last ch-1 sp made.
4th Rnd: Sl st in first dc, 4-dc starting shell in sp of same shell, ch 2, * shell in next shell sp - shell over shell made; ch 2. Repeat from * around. Join as before.
5th Rnd: Sl st in first dc, in shell sp make sl st, ch 3, 2 dc, ch 3 and 3 dc - 6-dc starting shell over shell made; ch 2, * in next shell sp make 3 dc, ch 3 and 3 dc - 6-dc shell made; ch 2. Repeat from * around. Join.
6th Rnd: Sl st in first 2 dc, 6-dc starting shell over shell, ch 2, starting at * work as for 5th rnd.
7th Rnd: Sl st in first 2 dc, 6-dc starting shell over shell, ch 3, * 6-dc shell over shell, ch 3. Repeat from * around. Join.
8th Rnd: Sl st in first 2 dc, in shell sp make sl st, ch 3, 3 dc, ch 5 and 4 dc - 8-dc starting shell made; ch 3, * in next shell sp make 4 dc, ch 5 and 4 dc -8-dc shell over shell made; ch 3, repeat from * around. Join.
9th Rnd: Sl st in first 3 dc, in shell sp make sl st, ch 3, 4 dc, ch 5 and 5 dc - 10-dc starting shell made, ch 5, * in next shell sp make 5 dc, ch 5 and 5 dc -10-dc shell over shell made; ch 5. Repeat from * around. Join. Break off and fasten.
Outline: Attach Pastels in marked sp, then remove marker. Working in the sps directly over each other between shells and also across each shell of last rnd, outline the shell spokes as follows: First Half Row: * Ch 3, sl st in corresponding sp of next rnd. Repeat from * to last rnd made, then making 5 sc in shell sp, sc in each dc across shell. Second Half Row: Sl st in next sp, * ch 3, sl st in corresponding sp of previous rnd. Repeat from * to rnd where thread was attached; then working in the same sps just used, repeat First Half Row. Repeat Second and First Half Rows alternately until all shell spokes have been outlined, ending with ch 3. Join to first st. Break off and fasten.
10th Rnd: Attach Main Color in sp of starting shell on previous rnd, working over the 5 sc, make 6-dc starting shell in same sp - another spoke started; ch 3, 6-dc shell in next sp between the outlined shells - another spoke started; ch 3, * 6-dc shell over shell, ch 3, 6-dc shell in next sp between the outlined shells-another spoke started; ch 3. Repeat from * around-24 spokes. Join to top of ch-3 and place a marker in last sp made. NOTE: Hereafter, always sl st in each dc and in the sp of first shell at the beginning of each rnd. The first ch-3 of each starting shell counts as 1 dc.
11 & 12th Rnds: Repeat 7th and 8th rnds.
13th Rnd: * 8-dc shell over shell, ch 3. Repeat from * around. Join.
14 & 15th Rnds: Repeat 13th rnd.
16th Rnd: * 10-dc shell over shell, ch 3. Repeat from * around. Join.
17th Rnd: * 10-dc shell over shell, ch 5. Repeat from * around. Join. Break off and fasten.
Outline: Now work Outline over the last 8 rnds as before.
18th Rnd: Repeat 10th rnd.
19th, 20th, and 21st Rnds: Repeat 7th rnd.
Next 6 Rnds: Repeat 13th rnd.
Next 2 Rnds: Repeat 16th and 17th rnds. At end of last rnd, break off and fasten. Now work Outline over the last 12 rnds as before.
30th Rnd: Attach Main Color in first shell sp on 29th rnd, ch 5, * 6-dc shell in next sp between outlined shells, ch 7, skip next shell. Repeat from * around, ending with a shell; ch 3. Join to first ch of ch-5.
31st Rnd: Working over the 5 sc in shell sp of Outline and the ch-7 of 30th rnd throughout, make a 6-dc shell over the starting shell on 29th rnd; 6-dc shell over first shell on 30th rnd, * 6-dc shell over next shell on 29th rnd, 6-dc shell over next shell on 30th rnd. Repeat from * around. Join.
Next 4 Rnds: Make a 6-dc shell over each shell around. Join.
Next 4 Rnds: * 6-dc shell over shell, ch 1. Repeat from * around. Join.
Next 5 Rnds: * 8-dc shell over shell, ch 1. Repeat from * around. Join.
Next 3 Rnds: * 8-dc shell over shell, ch 2. Repeat from * around. Join.
48th Rnd: * 8-dc shell over shell, 4-dc shell in next sp between shells. Repeat from * around. Join.
Next 4 Rnds: * 8-dc shell over shell, 4-dc shell over shell. Repeat from * around. Join.
Next 5 Rnds: * 8-dc shell over shell, 6-dc shell over shell. Repeat from * around. Join.
Next 9 Rnds: Make an 8-dc shell over each shell around. Join.
67th Rnd: Work as for last rnd, making ch 1 between shells.
68th Rnd: Sl st to center of first shell sp, * sc in shell sp, ch 3, in next ch-1 sp make dc, ch 3 and dc - V st made; ch 3. Repeat from * around. Join to first sc. Place a marker in last sc made.
69th Rnd: Sl st to next V-st sp, 8-dc shell in same sp, ch 2, * 8-dc shell in next V-st sp, ch 2. Repeat from * around. Join.
Next 5 Rnds: * 8-dc shell over shell, ch 2. Repeat from * around. Join.
Next 9 Rnds: * 10-dc shell over shell, ch 2. Repeat from * around. Join.
84th Rnd: * In next shell sp make 6 dc, ch 5 and 6 dc-12-dc shell made; ch 3. Repeat from * around. Join.
Next 5 Rnds: * 12-dc shell over shell, ch 4. Repeat from * around. Join.
Next 2 Rnds: Work as for 84th rnd, making ch 5 between shells. At end of last rnd, break off and fasten. Attaching Pastels in marked sc instead of sp, work Outline over last 24 rnds as before. Starch lightly. Block and press.
Blocking Instructions: For Rectangular or Round Tablecloth worked with Mercerized Cotton Size 20 or 30: Starch the entire cloth with cold water starch, using starch at medium strength. With right sides together fold article in half. Pin folded piece on a padded board or any other large, well-padded, flat surface, with rust-proof pins, gently stretching to one half the measurements specified in the directions. Press through damp cloth. Leave pinned in position until thoroughly dry. If necessary repeat above directions on opposite side.